In this section, we have put together everything you need to know about assembling single pieces of furniture. Single pieces of furniture are items such as armchairs or sofas that are made up of only one element. Even though they can be assembled much easier and faster than element groups, you should make sure to observe the following notes and the information in the “Before assembling” section.
1. Use the installation manual as a guide
The main reference for the assembly of element groups is the individual installation manuals. These A4 sheets are affixed underneath each individual element before delivery. The installation manuals depict what accessory parts (legs, screws, etc.) and what assembly tools are enclosed with the element and needed for assembly. One installation manual and possibly an accessories set is provided for each element.
The installation manual also shows what type of element the element is and how it is completed and assembled, so that you can tell which installation manual matches which seat element. An installation manual could look as follows, for example, for an external seat element:
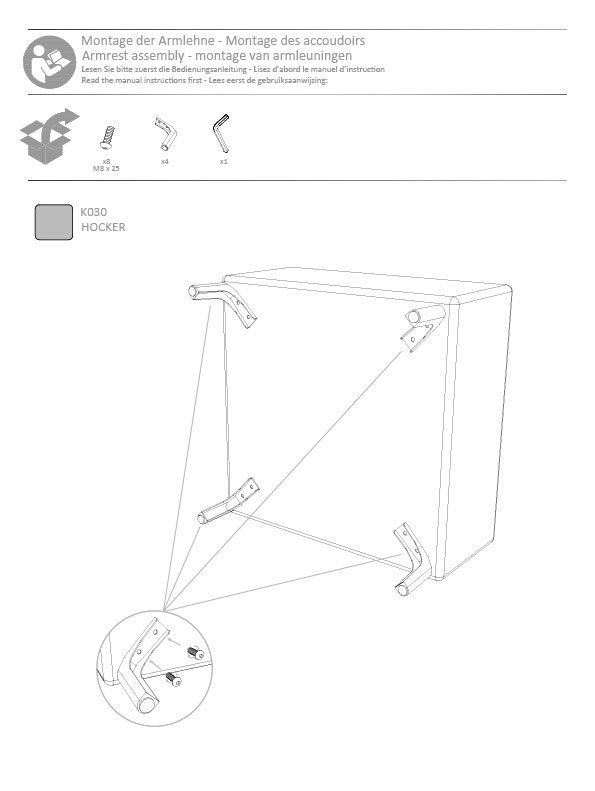
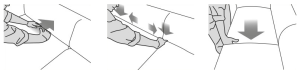
In this case, screws, decorative legs and an assembly tool are supplied with the element. The four decorative legs are fastened to the element with the screws. In the top left, it is also indicated that the element is a stool (dark rectangle “K030 HOCKER”).
2. Mount all loose elements
Depending on the design of your new upholstered furniture, it may have loose elements, which you will need to mount first. These may be decorative legs and/or support legs, or armrests and back:
Decorative legs made of metal or wood are visible design elements. They are therefore fastened on all external ends or sides, and on the back corner of corner elements. Decorative legs are intended to be visible and are simply screwed in place at the corresponding points.
Black plastic support legs are screwed onto the element in pairs (on the front and back). They are used for a standard element that is mounted onto a functional element. Support legs with metal tab are mounted between two standard elements. They are delivered with the right-hand element, where they are screwed on.
Armrestsare not always directly pre-mounted to the seat element before delivery. It must be noted that armrests are mounted in order from right to left, like seat elements. The armrest on the far right is therefore mounted on the seat element on the far right first.
In some models, backsare not directly pre-mounted to the seat element before delivery. To mount the backs, you can simply interconnect them with the seat element, however. No additional tools or mounting materials are needed.
⇒ Important! Precautionary measures when assembling loose elements Protect your floor!
- Protect your floor! Place blankets or the packaging material underneath the seat element.
- Work with at least one other person.
- Make sure to observe the information in the “Before assembling” section.
How to mount loose elements
- Place the seat element in the position shown in the installation manual. This will generally be the back or the side.
- For each seat element, open the packaging with the corresponding accessories and keep them together for each upholstery element.
- Mount the loose elements as described in the detailed installation manual (see above).
- Then lift up the completed seat element and place it upright on the floor. Check that everything has been mounted correctly.
- Überprüfen Sie, ob alles korrekt montiert wurde. Check that everything has been mounted correctly.
⇒Please note: support legs can be readjusted at any later date by simply screwing them in or out.”
Once you have set up the element as described in the installation manual, make sure that all legs are positioned on a level surface. This is the only way to ensure that the frame will operate evenly and retain its shape over time. To complete assembly, thoroughly pat the upholstered furniture into a fuller shape. Stroke the cover smooth sideways, over the seat, back and armrests.
⇒ If your upholstered furniture is equipped with electrical convenience functions, please also observe the information given under “Setting up the power supply”.”
3. tap
Take a couple of minutes to straighten and beat the upholstered parts. Your sofa bed just went on a long trip. During storage and transport, some upholstered parts may have been pushed in and stitching lines may have been moved.
If you followed all steps correctly, your sofa will now be perfectly set up.
Please read all further instructions on your sofa’s comfort functions and cover maintenance.