In this section, we have put together everything you need to know about dismantling element groups. Element groups are sofas that are made up of multiple elements – unlike single pieces, which constitute only one element. Often the upholstered furniture is fully assembled by the supplier on site, which means that you will not be familiar with the upholstered furniture’s mechanisms and connection methods. Dismantling element groups is, however, relatively straightforward: the procedure is similar to assembly but in the reverse order.
Be sure to observe the following information:
1. Disconnect the connectors!
For all upholstered furniture with electrical convenience functions, first disconnect the power supply by unplugging all mains plugs. For some element groups with more than two seats with electrical convenience functions, the seats will also be connected to each other. In this case, disconnect all electrical connections. To do this, press the small locking lever on the connector and then pull the connector out of the socket.
2. Installation manual reference document
The main reference for the dismantling of element groups is the individual installation manuals. These A4 sheets are attached underneath each individual element before delivery. One installation manual and possibly an accessories set is provided for each element.
The installation manual also shows what type of element the element is and how it is completed and assembled, so that you can tell which installation manual matches which seat element. An installation manual could look as follows, for example, for an external seat element:
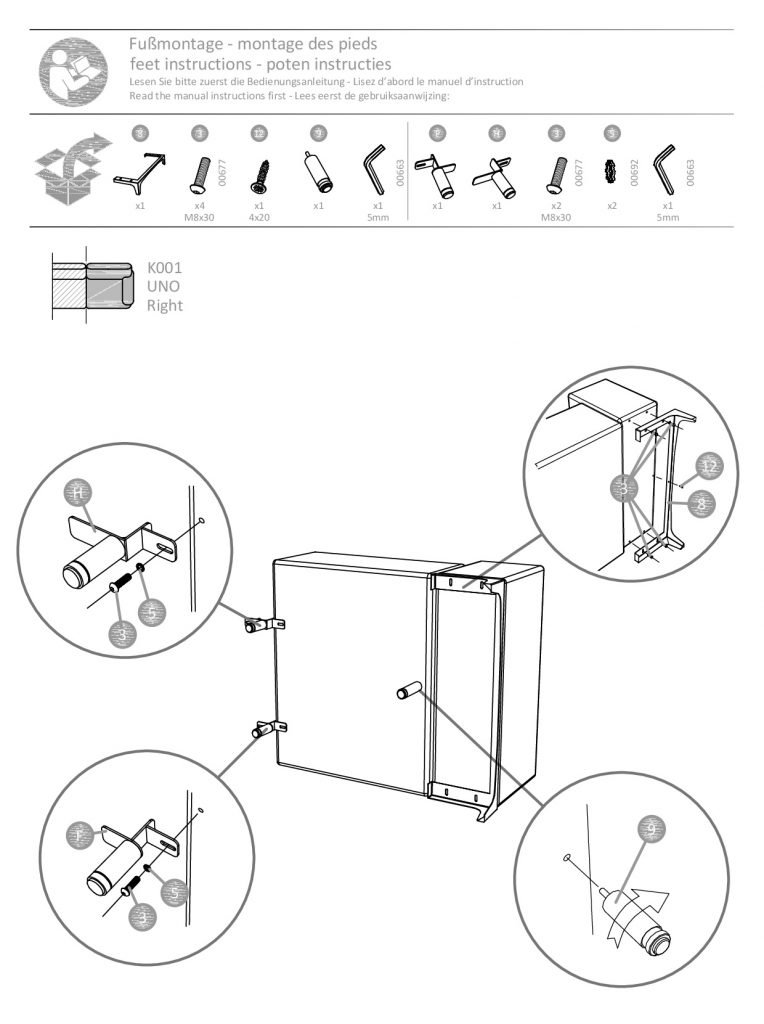
The small illustration in the top left indicates that the element is an external right seat element (dark rectangle “K001 UNO Right”).
3. Disconnect the individual elements
When disconnecting elements, note that connection fittings can be damaged if you simply disconnect the elements in exactly the same way that you put them together!
Group the assembly accessories for each element separately during dismantling. This will make assembly easier later on.
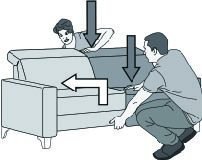
Now, working with another person (one at the front, one behind), lift up the element on the LEFT as seen from the front by two centimetres and carefully pull it away from the right element:
⇒ Please note: when two Relax elements are connected side by side, they are joined with an additional metal plate. To detach the metal plate, work with another person to place the both seat elements on their backs and unscrew and remove the metal plate.
4. Detach all loose elements
For some projects, it may not be necessary to detach all individual elements. For some projects, it may be necessary to detach all individual elements. For more extensive projects, for example if you are moving house, we recommend unscrewing and removing all protruding parts.
⇒ Important! Precautionary measures when detaching loose elements
- Protect your floor! Place blankets or similar underneath the seat element.
- Work with at least one other person.
- Never use force! If parts such as headrests or backrests cannot be removed, we strongly advise against dismantling these parts!
How to detach loose elements
- Place the seat element in the position shown in the installation manual. This will generally be the back or the side.
- Detach the loose elements as described in the installation manual.
- Be sure to store all elements, including screws and other materials, carefully!
- For models with crocodile connections, the backrest is not affixed to the seat element. To separate the backrest and seat, simply lift the backrest up out of the seat element.